Monday, April 29, 2013

Want to Make Your Food Taste Better?


Many years back, I was at my dear friend Meg's house and I thought she was making chicken soup. But she corrected me and told me that it was stock she was making.

I questioned this- why make your own? Meg gave me a quick lesson and gave me some in a container to take home.

That was that. I was hooked.

Yes, it makes that much of a difference.

I know what you are thinking, WHY make it when they sell it in the store? That's what I thought, but  there is NO comparison!

And, my economically minded friends, it is MUCH more cost effective to make it, then buy. 

You need to save chicken bones. This is where some of the savings starts. Nature's Promise Whole Chickens are $1.89 a lb (even cheaper when on sale) So you can get a 5 lb chicken for the price of  1&1/4 lbs of chicken breast. I have learned it is quite easy to chop up a whole chicken, but if you are not into this, ask your butcher or even the nice guys at the supermarket to cut it for you. They will, for no charge.When you see legs or wings on sale, grab those too. Freeze them if you don't use them right away. 

So when I make the chicken breast for my kiddos, I take them off the bone & then the bones go into the freezer or fridge if I am making stock the next day. Sometimes I even make stock when I am making chicken. 

In a big stockpot (mine is 12 quarts I believe):
put your raw chicken carcasses - if your carcasses do not have much meat on them, add a 4 pack of wings, thighs or drumsticks to the pot. (You want to use parts of the chicken that have lots of bone in them. The bones give the yummy flavor!)
2 medium-large onions (peel them- onion skins can give a bad taste to stock!)
4 carrots
4 stalks celery (leaves too- I usually save the insides of the celery for this)
5-10 cloves garlic (peel them)
2 bay leaves
1 tablespoon salt
1/2 tablespoon fresh ground pepper
10 or so whole peppercorns
cover with COLD water
Optional- I sometimes add a parsnip or tops of fennel bulbs to the stock. Adds a yummy taste & saves on waste!

Bring to boil & then cook low & slow about 4-6 hours covered. Add water if need be. All the ingredients in the stockpot should be covered in water. You can use a strainer or something else to hold down the ingredients so they are submerged.


Here's our stockpot with a strainer used to hold everything down.

Skim off the fat as needed. This was a pre-skim shot. You can see the fat and skin there, just skim it away.

When it is done, you will have golden, luscious stock. Strain and put into containers. Will keep 1week in fridge but will keep a long time frozen. Highly recommend using the take out soup containers to keep separate quarts in freezer. Take it out as you need!

Once you make stock you will see how very simple it is and how much better everything tastes! We makes soups and risotto all the time with it. We use it to make gravy, add some to cook rice, to mashed potatoes...

I could go on and on....

but now I am hungry and I am going to eat lunch! ; )

Cook on!


Monday, April 22, 2013

Happy Earth Day and a Quick Yummy Recipe

Spent a lot of time this weekend outdoors taking care of our space. Weeding, tending our flower beds and prepping the garden beds. No pictures of all that fun! 

BUT...

with lots of fruits coming into season just around the corner, I thought it was the perfect time to share a little recipe I make when we have some fruit that is bursting with flavor but not at it's most pretty. Make some compote!

A compote is a recipe consisting of some sort of fruit that has been stewed in a syrup of sugar and some other flavorings added.

I made my first compote when we evacuated to my in-laws house during hurricane Irene. I had quite a bit of fruit and was afraid it would spoil if we lost power and didn't eat it fast enough. So I decided to cook it while we still had power.

I had a half pint of blue berries, a quart of strawberries and a pint of raspberries. I put them in a saucepan, added some water (a cup maybe) and a little sugar. Threw in a few lemon peels. Let it simmer on low.


Stir Occasionally. You cannot walk away from this. If it boils over or burns, you will not be happy! But it is a very quick cook!

Cook it down until it reaches the stage you like. If you like chunky, cook it less, if you like it less chunky, mush it up and cook it longer!


The result is a yummy, fresh fruit deliciousness! YUM!! It keeps very well refrigerated. Can't say exactly how long it keeps, as it tends to disappear in less than a week in my house. 

My daughter loves this on pancakes, french toast, or just by the spoon! My son likes it on corn muffins, which was the way he got it first during Irene. He protested easting it at first but then was slathering it on after I made him take a "thank you" bite! You can swirl it on yogurt, add to ice cream, endless uses!!

A "thank you" bite, is a Thank You to mommy for making it. I don't force him to eat more, just to try it. It has worked and has expanded his diet quite a bit...just in case you fellow mom's have a "challenging" eater too (I hate the word picky....)

Anyway, I know this technically isn't a recipe, BUT it is very handy to have in your pocket.

I have read Americans throw out upward of 20% of the food they buy, which is horrible considering cost of food and how many people are food insecure in this nation and the world. So we are trying to reduce the amount we waste and this is a VERY tasty way to do it. :)

I keep frozen berries in the fridge for when my fresh fruit is ready but I don't have enough of it for a full batch. Just add it in. Helpful tip: Use less water with frozen fruit as they will release more water as they defrost and cook!

You can get fancy and used dried fruits and liquors and add fancier flavorings like vanilla, cinnamon and cloves. 

As an added benefit, your house will smell scrumptious! 

Cook on!

Friday, April 12, 2013

The Quilt is Finally Finished!

Our town offers many continuing education classes, and a few years back I found an introduction to quiltmaking class and signed up! I have been sewing since I was very small, and have had been wanting to learn how to quilt for a long time.

I am SO glad I signed up! Our teacher, Judy Wilhelm is incredibly talented. Her tips and tricks she has taught us along the way are invaluable! I often see something online or in a book and think, if they only had Judy to show them an faster/better/easier way! Her work is inspiring, her hand quilting is impeccable! Needless to say, I have continued with her classes ever since!

Over the course of the last few years, our little group of quilters in our class has become a little oasis of creative friendship for me. I look forward to Wednesdays with the ladies and how we learn and share from each other. We all make the same quilt at the same time, but with fabric choices, alternate stitch patterns and little twists, they all come out as incredibly different works of art. 

Our quilt from LAST semester I just finished up yesterday, halfway through current semester. So much for deadlines ; ) We made an Irish Chain quilt, which we were supposed to use three fabrics to make. I had a different idea and Judy being the amazing teacher that she is, helped me achieve my vision of using a beloved half yard bundle of Sherbert Pips by another amazingly talented individual, Annela Hoey for Moda fabrics.  I had splurged on the bundle for my birthday and was trying to find the right fit. The wide open blocks of the Irish Chain seemed right for highlighting the beautiful illustrations of little girls on tree swings, little dogs and girls on scooters. If you have not seen Annela's work or fabrics, do check her out! She has a new line called Posey that is super sweet as well!

Having half yards of the fabrics meant I would need to use many more than three fabrics, but Judy and my fellow quilters helped me figure out a pleasing way of mixing and matching the prints. 

Here is the finished quilt. I just LOVE it! 


I had to fussy cut the squares with the girls and dogs (that means to cut them out one by one to ensure I was getting the right part of the fabric print in the piece and ensured I didn't decapitate a little girl or dog!  That would NOT be the look I was going for : )


I knew I wanted to do a pieced back. Many quilts have backs that are all the same piece of fabric, but there is a new group of Modern Quilters that make the back as interesting as the front! I love the idea, and have been quick to embrace it on my quilts. My dear friend Sylvie had the brilliant idea to make a 9 patch back to mirror the 9 patches in the Irish Chain on the front! A nine patch is a square made up of 9 fabrics, kinda like a tic-tac-toe board. I had no idea quilting had so many terms and patterns before I started!

It looks perfect right?


Guess who couldn't wait to try it out? The quilt was declared snuggle worthy!


What do you think?

Quilt on!


Tuesday, April 9, 2013

A Special Hat for a Special Girl

I found this amazingly cool yarn from a favorite yarn site of mine, Chelsea Yarns, run by the ever helpful Christina Lundborg. They have a beautiful, eclectic selection of yarns in stock and are adding new interesting ones all the time. AND they just opened up a brick and morter store, so if you are in NJ, go shop local! If not, you can find her here http://www.chelseayarns.com/

For the record, I do shop at my LYS stores. But sometimes I crave something different that I haven't found locally, which brings me back to Chelsea Yarns...

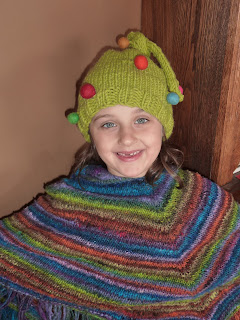
While shopping recently on her site, I found this amazing yarn called Candy, by Feza yarns, a wool/acrylic bulky yarn with felted wool balls attached as one with the yarn. It LOOKS like candy, doesn't it??


I knew my little girl needed a hat out of this cool yarn in a funky design.  

So I cast on and whipped up this funky little hat for her. 

When I gave it to her in the morning, her eyes widened with delight.

"For me??"


And promptly put it on her head. And kept it there all day. 


Of course, the temperature just spiked. But do you think that stopped her from wearing her new hat to school today?

Not a chance.


LOVE the knot! Isn't it cool!

Raveled here: candy-topknot


BTW...Little Miss O is wearing a Noro Kureyon hooded poncho I made her many years ago in the photo. I had the yarn displayed in a bowl in my living room and she picked it up and asked me to make her something pretty out of the yarn so "I can wear a pretty rainbow!" How could I resist. She has worn it for four years now and it still looks brand new. How's that for a good investment? If your little girl needs one, there is one in store at Rexer-Parkes or we could design one especially for her. 

Knit on!

Sunday, April 7, 2013

April Showers Bring Cute New Knits

How adorable are these knitted rainbooties? Wellies! LOVE! 

Hand knit by me in yummy cotton with cute details, they are super sweet.


After I made up this pair, I knew I had to make one in rain slicker yellow trimmed with grey, which OF COURSE meant I had to design a rain hat to go with them...


I think they came our pretty awesome.

I can't take credit for the bootie pattern (although I did have the same idea sketched out in my "to make one day" pattern book). But when I saw the pattern by Julie Taylor on Craftsy, I had to buy it to support a fellow knitter, especially since she allows knitters to sell products using her patterns. (Thanks Julie!) Her pattern was in wool, but I changed the yarn to cotton & adjusted the gauge accordingly. 

You knitters can buy her pattern on Craftsy.com. 

If you are not a knitter, these are are in store now at Rexer-Parkes in Huntington NY. : )   Or you can always contact me and I can make them in custom colors for you. SO MUCH FUN to play with color! 


Don't fret if you don't live near Huntington. 

Just call Rexer-Parkes and they can ship them right out to you. (631) 549-1810.

I think we need a girlie option...maybe hot pink and lime? hmmm. What do you think? What colors would you like to see?

Splash On!


Wednesday, April 3, 2013

What we did on our Spring Break Vacation

It was nice to have a week off from school! We spent lots of time with friends and family visiting parks, going on bike rides and having fun. 

We decided to spend Easter Sunday as a family day in New York City. What a perfect day!

We started our bright and early at the Museum of Modern Art. For those of you who haven't been there, you have to check out their MoMA Family Gallery Talks. We did the A Closer Look for Kids program, for kids ages 5-10. They have other ones for younger & older kids too, so check out their site. The programs there are amazing and our tour guide, Ada was so engaging. (thanks again Ada!!) 

Tours start at 10:20am and are FREE (yes, free!) Get their early, as tickets are given out at 10am on a first come, first serve basis. 

We got there at 9:30 and spent some time hanging out. MAP saw this work by Andy Warhol and instantly was inspired for a joke!


"Bessie, where are you?"


One of the pieces on our tour was The Sleeping Gypsy by Henri Rousseau. Our exercise was to make up a story of what happened next in the painting.


 MAP described the scene as taking place in Egypt, where a curious lion walked by a sleeping woman in the moonlight. She had come to gather water for her husband's farm in the jug next to her lute. 


One of the special exhibits featured The Scream by Edvard Munch. Very moving. You truly feel the emotions....


Another special exhibit was applied design, which featured items that were unique and beautiful and also useful. For example, this piece above is designed after a tumbleweed which is brought to warn torn lands and used to detonate land mines. They are cheap to produce and keep people safe from the mines. 


After we finished exploring MOMA, we stepped outside and found ourselves in the middle of a massive gathering for the Easter Parade. Look below to see some of the fancy hats.


Love this one!


We also saw a parade of Easter Bunnies carrying signs. This was the best picture I could get due to the crowds, but it was quite a sight.

After a quick lunch, we headed uptown.


Central Park has the BEST rocks for climbing!

We ended up at the Museum of Natural History. 


This is a geode. Geodes look like rocks, but if you crack them open, YOWZA! They are gems. 


Impressive rock from the Hall of Gems. 


A beautiful ancient ammonite (ammonites are an extinct group of marine invertebrates for those of you keeping score at home) A beautiful girl too. :)


This massive tree was perhaps the oldest tree on Earth when it was cut down. Just look at those RINGS!


Squid vs. whale. Who will win?

(Full disclosure - the image captions were created with the help of MAP. He felt that a little humor would make you want to read this blog post instead of "yawning and exiting the blog" ah, kids ;)

After many more halls and many more pictures and facts learned we were starving and headed out for dinner. 

I have to say, it was a perfect day. I think I feel a new Easter tradition coming on. 

Summer is quickly approaching and we'll have many days to fill. Drop a comment if there are some museums and/or shows we should visit!

Go and get your Art On!  

Tuesday, April 2, 2013

Time to Make the Biscuits. And Scones. Mmmmmm!

I love to bake. LOVE IT. I remember when it started. I decided to make Baklava from scratch for Christmas one year. You know, the traditional, Italian Baklava ;)  Kidding. I was looking to make something to bring to my in-laws for dessert that wasn't already taken. There are many impressive bakers in the family and I knew this wasn't already an offering. 

Well, it was so easy and it was SO impressive to my family in-law! I realized that baking was going to be my thing. Now I do it as often as I can! 

One thing I love to make is biscuits. Just seven ingredients, a little time and viola! Layers of flaky loveliness. Then I discovered making scones was just as easy and that was my new favorite, but then we came upon a dilemma.

The males in the house love biscuits, while the ladies like the scones best. What to do? One sunday morning I looked at my favorite biscuit recipe and realized it was pretty similar to my favorite scone recipe, so I decided to make a batch of biscuits and divide the dough and make half biscuits & half scones! This is now what we do and I am lucky enough that Little Miss O likes to get in on the action and help!

So the recipe:

Ingredients:
4 cups all purpose flour
1 tablespoon plus 1 teaspoon of baking powder
1 teaspoon of baking soda
1 teaspoon salt
1 teaspoom sugar
2 sticks (1 cup) unsalted butter, cold, cut into small pieces (OR for a Dairy free alternative, substitute same amount of Earth Balance dairy free margarine sticks)
1 3/4 cups buttermilk (dairy free alternative- use 1 3/4 cups plain almond milk or milk substitute of your choice with 1 tablespoon applecider vinegar. Let sit for 10 minutes or a little longer to curdle)
A few tablespoons of melted butter or butter substitute to brush on top of biscuits prior to baking 
For scone option - a scone filling- we like dried apricots and sage

Equipment:
Pastry blender
Pastry brush
baking sheets/trays
rubber spatula
2 - 3" biscuit cutter

Preheat over to 375 degrees. 

Line two large baking sheets with parchment paper trimmed to fit.

Add all dry ingredients in a bowl.

Add butter and use a pastry blender to cut the butter in until the mixture resembles coarse crumbs.  

Then pour in buttermilk and use rubber spatula to fold it in. Dough will be slightly sticky.

Flour a board liberally and get your hands floured up or they will stick! (we keep a measuring cup full of flour next to the board)

Take about half the dough onto the board and press out gently. DO NOT overwork the dough. You want nice, fluffy biscuits! Make dough about 1" thick and use a biscuit cutter (2" to 3" in diameter- use what you have on hand!) to cut out biscuits. We usually make 15 biscuits. The rest we use for scones.

To make the rest into scones, take half of the remaining dough and press it out into a rectangle. sprinkle a little bit of sugar 1/2 teaspoon or so in the middle of the rectangle. Cover the sugar with your scone filling- we LOVE to use dried apricot and sage, both cut into pieces. You can get very creative and use what you like! 

Roll the bottom up to cover the filling then roll the rest of the way. Cut the log you made into pieces-maybe 3/4" or so thick. When you are placing them on the tray, make sure they are wrapped well so they don't come apart when baking. I like to make sure the bottom of the scone is dough (not filling- the filling will burn) so I pinch the bottom to ensure no filling is showing through. 

Brush the tops of the biscuits and scones with a tiny bit of butter or butter substitute before baking with the pastry brush (you can always brush with buttermilk if you prefer) Sometimes, we add a tiny sprinkle of sugar on top of the scones. mmm. 


Bake for 18 to 20 minutes, rotating halfway in between so they bake evenly.

As with all baking check when you get close. All ovens cook differently. No one wants to eat a burnt scone!


Little Miss O using the biscuit cutter to cut out biscuits for the boys.


Make sure to flour up those hands!!


Only a few more biscuits to cut out and it's on to the scones : )

JUST FOUND THESE PICS from another day of scone making. Yes, little ones can bake! Look at her go. 


Wait until you taste these out fresh out of the oven. OUTRAGEOUS!

We make these all the time for functions, brunches and snow days. They are super simple, impressive, delicious and INEXPENSIVE to make! Using top quality ingredients, for less than  $4, we have over 2 1/2 dozen biscuits and scones! Price that out at a bakery!

What your favorite scone fillings??

Leave me a comment and let me know  Would love to experiment with other flavors!

Bake on!